![]()
SETTING UP REPLICATION IN POSTGRESQL 11 & CentOS 7

Replication is copying the data and even the structure of a database server to another. PostgreSQL is an open-source object-relational database. This database can be easily used on any modern operating system, such as Linux, BSD, Unix, or Windows. Now, replicating databases allows a distributed architecture across multiple servers, making a high-availability environment. There are many replication models, and this article will show you how to set up a simple Primary – secondary configuration. In this model, the secondary server constantly maintains a copy of the Primary in case the primary server fails. When a master database server fails, the secondary server can be upgraded to take the Primary’s position. This article will set up two databases to replicate in CentOS 7.
POSTGRESQL CONFIGURATION
I will assume that you currently have two servers already loaded with PostgreSQL. See my other article on PostgreSQL installation for instructions on installing and the initial setup.
SERVER CONFIGURATIONS
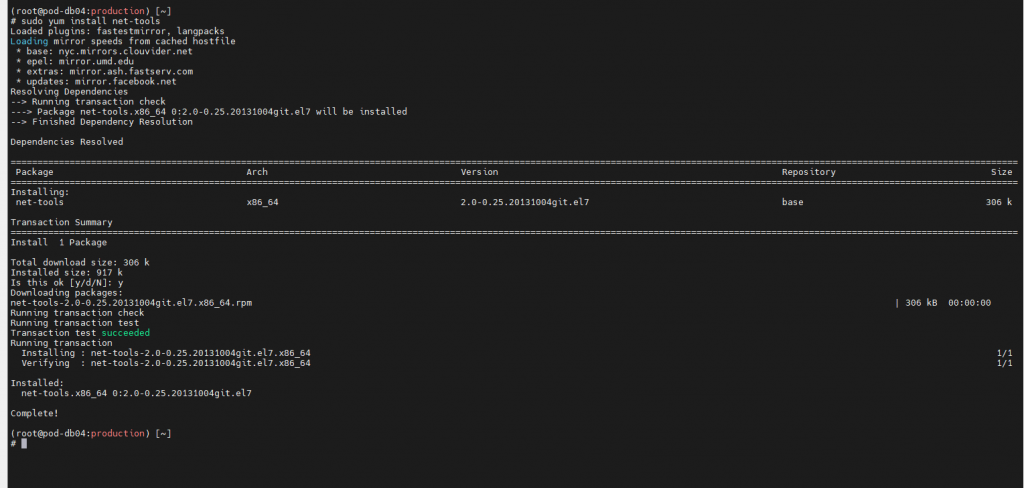
Before moving forward, we want to verify that the firewall on both servers is set up correctly and has PostgreSQL’s port 5432 open. You can check the status of the port by using the netstat command. If netstat is not installed on the server, you can use the following to install it.
sudo yum install net-tools
Once installed, use the command netstat -plntu, to check the status of port 5432. By default, this command must be run from an elevated account such as root or using SUDO to allow the “p” switch to be used. Otherwise, a warning will be displayed showing (No info could be read for “-p”: geteuid()=3999, but you should be root.).
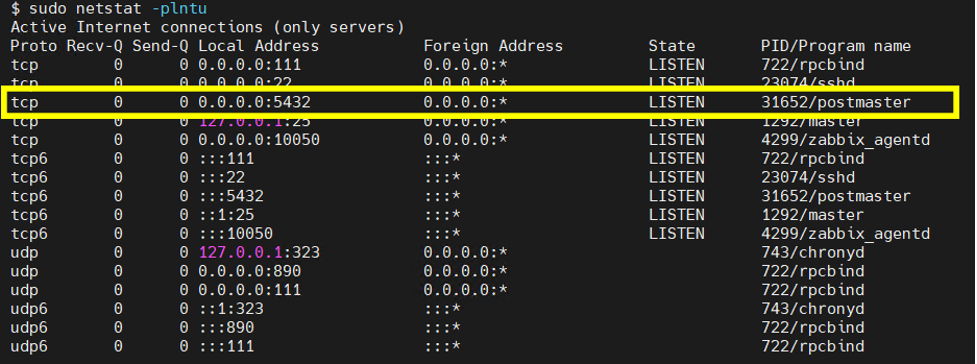
Port 5432 should be in LISTEN status if everything is configured correctly.
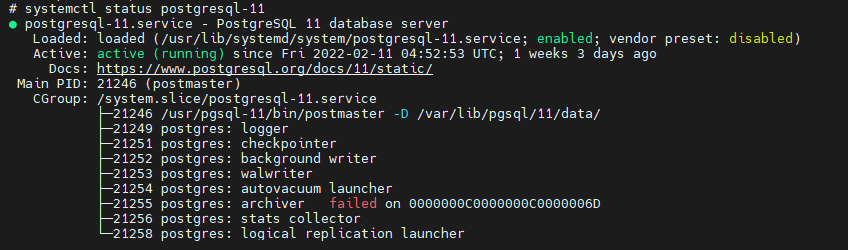
If Port 5432 is not in LISTEN status or not even listed, there is a chance that PostgreSQL is not running. To check is the service is running use systemctl status postgresql-11 To the right of Active, you should see active (running), otherwise, this is an issue with the database. If this is the case, you will need to troubleshoot the database server prior to continuing setting up the replication.
Another tool like Netstat is Socket Statistics or commonly known as SS. To gather similar information about the port, enter the following command at the prompt:
ss -a | grep 5432

In this example, I use the grep command to filter out all the socket information and leave only the concerned ports. As you will notice in the picture above, two lines are shown for the output. These are two sockets for Postgres that are listening on port 5432. A feature of this command is that it can run at a standard prompt, unlike the full Netstat command that I have shown earlier.
FIREWALLD CONFIGURATION
Firewalld is the firewall management tool for CentOS 7. To ensure it is working smoothly with the database, we need to start the service and have an open port for Postgres. To check if the firewall is active, use the following command:
systemctl status firewalld
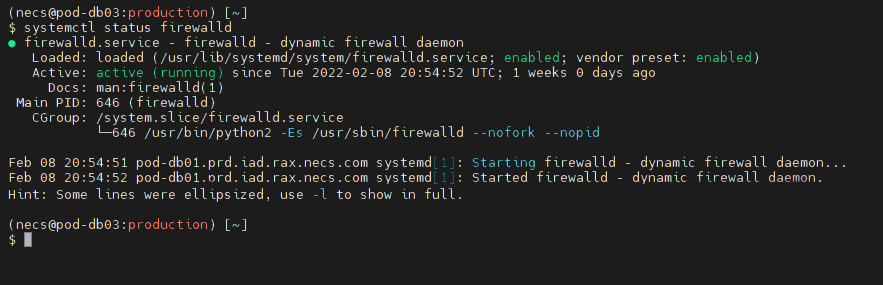
If your firewall is active, you will see “active (running)” in the Active line, as shown above.
Use the command- systemctl start firewalld to start the firewall. By default, this command must be run from an elevated account such as root or using SUDO.
systemctl start firewalld
To enable the firewall to be automatically started upon a restart, use the command systemctl enable firewalld. This command also requires to be run from an elevated account or use SUDO.
systemctl enable firewalld
Now the firewall has been enabled and started, add the Postgres service as an exception to the firewall rules. To do this, execute the following from an elevated account or use SUDO.
firewall-cmd –add-service=postgresql –permanent
This command will add the exception to the firewall rules to allow the Postgres service to send and receive data. You will now have to reload the firewall service to enable the new rule. To do this, execute the following from an elevated account or use SUDO.
firewall-cmd –reload
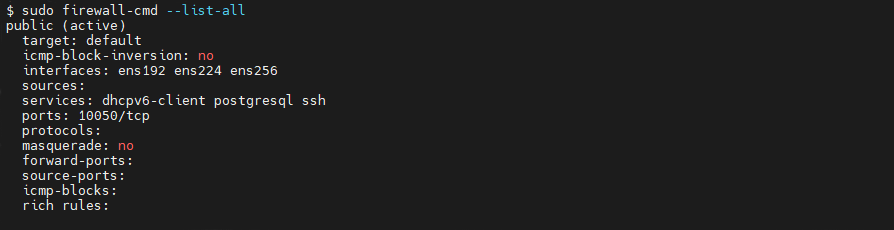
Now, check if the service can use the firewall settings and reload the firewall. To do this, execute the following command firewall-cmd –list-all from an elevated account or use SUDO. If everything is correct, you will see postgresql listed in the services.
firewall-cmd –list-all
Once you are done with the Primary, this will have to be done for the secondary server.
PRIMARY SERVER CONFIGURATION
Now we will configure the Primary PostgreSQL Server. This computer will be the main server with full read and write permissions. In this configuration, the Secondary will read-only and receive data from the Primary.
What IP Address will the Primary Server use to communicate with the Secondary? The best address would be a private address not accessible outside your server network. These changes will keep the network collisions down to a minimum and add an extra layer of security to the servers. To find the available IP Addresses, enter the following command:
IP -a | grep “inet “

This command will show you the available IPV4 addresses currently on your server. In the example above, 172.16.1.10 is the primary IP Address for the server, and the two 10.0.X.X addresses are private for the server network. I will use the 10.0.3.10 address for replication and leave the others as they are.
Change your working directory to /var/lib/pgsql/11/data. This directory is where the configuration files for your database exist. To do this, execute the following from an elevated account or use SUDO.
cd /var/lib/pgsql/11/data
The first configuration file to edit is the postgresql.conf file. To do this, execute the following from an elevated account or use SUDO.
vi postgresql.conf

This command will bring up the configuration file in the default visual editor called VI. The first line to alter is the listen-to addresses. Scroll down to the entry, or you could use the find command within VI.
/listen_addresses
This command will bring you to the first entry that matches the text you just entered.
Uncomment the line by removing the pound sign (#). The listen addresses are the IP Addresses that the database server will listen to, and any IP Address not on this line will be ignored.
There are two ways of setting this line, and I have left it as an asterisk. That entry will allow the database server to listen to all of my IP Addresses that the server is configured. If you don’t add the address you want the Secondary to communicate, replication will not work. Also, if you don’t add the primary address of the server, you will not be able to communicate with the database.
For my example, you could use the two following entries:
Listen_addresses = ‘*’
This entry will allow Postgres to listen to all available addresses.
Listen_addresses = ‘172.16.1.10, 10.0.3.10’
This entry will only let Postgres listen to 172.16.1.10 & 10.0.3.10. It will ignore any traffic from any other IP Address that the server might have configured.
Next, scroll or find the line wal_level. The wal_level dictates how much information is written to the WAL or what is also called the Write Ahead Log. If it is commented, uncomment the line and change it to hot_standby.
wal_level = hot_standby
The following change is to the synchronous commit settings. This setting specifies whether transaction commits will wait for WAL records written to disk before the command returns a “success.” The correct settings are on, local, and off. For replication, we want to have it set to local. Scroll or use the find function of VI to the synchronous_commit entry. If it is commented out, uncomment it and change it as shown below
Synchronous_commit = local
Now, scroll or locate the entry archive_mode. When enabled, this setting will allow completed WAL segments to be sent to the archive storage designated by the entry archive_command. For replication to work, the Secondary Server will be required to read the WAL files from this selected location. If it is commented out, uncomment it and change it as shown below
Archive_mode = on
The other setting required to be set for replication is the archive_command. The entry should be located a line or two below the Archive_mode threshold. This entry is the shell command that will be called to archive a WAL file. Archive commands will be ignored if-archive mode is off, and also archiving will be ignored if the archive command is blank no matter if the archive mode is on or not.
If the archive_command is commented out, uncomment it and change it as shown below
archive_command= ‘cp %p /var/lib/pgsql/11/archive/%f’
The following change for the PostgreSQL configuration file is to change the replication settings. Locate or scroll down to max_wal_senders. This entry specifies the maximum number of concurrent connections. The default is 10. If the value is zero, it means that replication is disabled. The ideal value is the number of replication servers. That equates to the Primary plus all of the Secondaries. For a simple Primary and Secondary, that would add up to two. If the archive_command is commented out, uncomment it and change it as shown below
max_wal_senders = 2
In the following lines in the configuration file within the Replication section, you will find wal_keep_segments. This setting specifies the minimum number of past log file segments in the pg_wal directory. If, by chance, the wal_keep_segments entry is commented out, uncomment it, and change the value ten if by chance it is not already.
wal_keep_segments = 10
The last line to update in the configuration file is the synchronous_standby_names entry. This entry specifies a list of standby servers that can support synchronous replication. This is a list entry, and if you have more than one server, comma separate the names. If this entry is commented out by chance, uncomment it and set it to pgsecondary01.
synchronous_standby_names = ‘pgsecondary01’
The changes to the configuration file are completed. Save the file and exit VI. Since we have enabled archiving, we will create a new directory for the archive files. These commands also require running from an elevated account or using SUDO.
To create the directory enter the following:
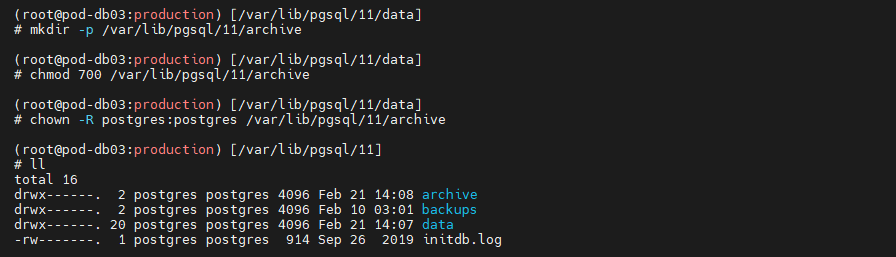
mkdir -p /var/lib/pgsql/11/archive/
This command will create the archive directory, and the -p flag will enable the parent directory as necessary. Since the directory exists, no errors will be displayed. The following command chmod will set the permission of the directory to allow access from other users while the local database user still has full access. To do this, enter the following:
chmod 700 /var/lib/pgsql/11/archive/
The last setup for the archive folder is to set the user and owner of the directory. This is done with the chown or otherwise known as change ownership command. To change the ownership of the directory and any object that may reside in the subdirectories, enter the following:
chown -R postgres:postgres /var/lib/pgsql/11/archive/
When you have completed changing the ownership of the directory, verify that all is set by using the command LL. This command will list the names, permissions, date, time, and size of the contents of the /var/lib/pgsql/11 directory. With this, you can verify that the ownership of the folder and permissions are set like the picture below.
The next configuration file to edit is the pg_hba.conf file present at the directory /var/lib/pgsql/11/data. Use an elevated account or SUDO to edit this file with VI.
The following example will set up a replication user “replica” and the IP addresses allowed for access. Here I have used 10.0.3.10 and 10.0.3.11. These are the IP Addresses of my test servers. Replace the IP addresses with the current ones for your servers.
host replication replica 127.0.0.1/32 md5
host replication replica 10.0.3.10/32 md5
host replication replica 10.0.3.10/32 md5
host replication replica 10.0.3.11/32 md5

Save the file when the changes are completed and restart the database. To restart the Postgres service, use the command systemctl restart postgresql-11 with an elevated account or SUDO.
systemctl restart postgresql-11
When the system has completed the postgresql service’s restart, it is time to create a new user. This user “replica” will be used for replication and create the user to perform the following.
The first step is to switch your user to the postgres user. To do this, SU to the user postgres.
su – postgres
Once you are in that account, enter the following to create the user replica.
createuser –replication -P replica
It will request a password for the user when it is created. Use a password that doesn’t use any special characters. These will not work when you use them in the Secondary’s configuration file, and these will not work. For my example, I used Welcome10. Please write down this password. It will be used when you set up the Secondary Server replication configuration. This now completed the Primary setup and the creation of the replication user.
SECONDARY SERVER CONFIGURATION
Once the Primary Database Server has been configured, it is time to configure the Secondary Server. For this example, we will configure the Secondary Server to use the IP Address 10.0.3.11. Also, we will allow only read-only on this server. To start, we need to stop the Postgres service by using the command systemctl stop postgresql-11 with an elevated account or SUDO.
systemctl stop postgresql-11
Once the Postgres service has been stopped, it is time to back up the data directory. This can be done by the following.
cd /var/lib/pgsql/11/
mv data data-backup
What we are doing is renaming the data directory from data to data-backup. Since we removed the data directory, now we need to create a new data directory. If you are not in the /var/lib/pgsql/11/ directory, cd to the directory before executing the following:
mkdir -p data/
chmod 700 data/
chown -R postgres:postgres data/
Now you have a new data directory, but it is empty. It is time to copy all of the data directory from the Primary to the Secondary server. To start, change your user to the postgres user, which is done by the switch user command “SU.”
su – postgres
Once switched, enter the following command from an elevated account or SUDO.
pg_basebackup -h 10.0.3.10 -U replica -D /var/lib/pgsql/11/data -P
Use the IP Address of the Primary Server instead of 10.0.3.10, which I have in the example above. Type in the password when prompted. This command will take some time to process as it will copy the complete contents of the Primary Server’s data directory to the Secondary’s data directory.
Once this operation has completed, change your directory to /var/lib/pg/sql/11/data. This can be done by using the following in an elevated account or SUDO.
cd /var/lib/pgsql/11/data/
Now, edit the postgresql.conf file, as there are a few changes to distinguish it from the Primary Server. To do this, execute the following from an elevated account or use SUDO.
vi postgresql.conf
This command will bring up the configuration file in the default visual editor called VI. The first line to alter is the listen-to addresses. Scroll down to the entry, or you could use the find command within VI.
/listen_addresses
This command will bring you to the first entry that matches the text you just entered. Unlike before, where we wanted to communicate with the database server from other than the Secondary Server, this time, we want only limited access. Change the listen to address to be the address of the Secondary Server.
listen_addresses = ’10.0.3.11’
Another option for an IP Address is to use an asterisk, allowing the server to respond to requests on all of its IP Addresses. This is a good option if you want to connect via a SQL IDE or similar to check the progress of the data flow. I have selected this option as I monitor both Primary and Secondary Servers via PGAdmin.
listen_addresses = ‘*’
The one other line to change is the hot_standby entry. If it is commented, uncomment the line and change it to on.
hot_standby = on
The changes to the configuration file are completed. Save the file and exit VI. Since we have enabled archiving, we will create a new directory for the archive files. These commands also require running from an elevated account or using SUDO.
It is time to create the recovery.conf file. This is a configuration file used with standby servers to specify where the Primary Server is located for streaming replication or when using WAL files. Using an elevated account or using SUDO create the file using the command:
vi recovery.conf
With the Visual Editor open, enter the following to create the new configuration file.
standby_mode = ‘on’
primary_conninfo = ‘host=10.0.3.10 port-5432 user=replica password=Welcome10 application_name=pgsecondary01’
trigger_file= ‘/tmp/postgresql.trigger.5432’
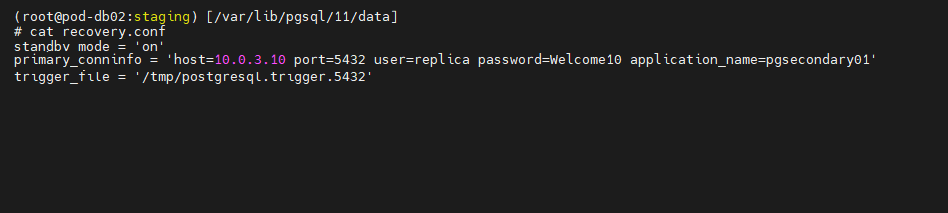
Change the hostname to match the Primary Database Server’s IP Address and the password to the one you used to create the replica user on the Primary Server. Once these changes are completed, save the file.
Permissions and ownership of the recovery.conf file will need to be changed. Using an elevated account or SUDO, change the permissions and ownership using the commands.
chmod 600 recovery.conf
chown postgres:postgres recovery.conf.
Once all changes have been saved, start the server using the command
systemctl start postgresql-11.
With this, we complete the Secondary Server configuration. You can use netstat to verify that the secondary connection is working using the command- netstat -plntu
TESTING THE CONFIGURATION
We have arrived at the point where we can test the configurations and see the result of our work. Login to Master and switch to postgres user using the command-
su – postgres
To check the streaming state replication using the following commands:
psql -c “select application_name, state, sync_priority, sync_state from pg_stat_replication;”
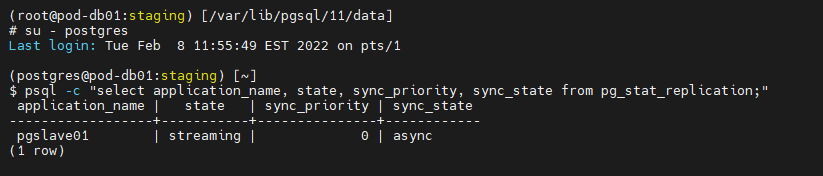
You should see state value as streaming and sync_state as async.
psql -x -c “select * from pg_stat_replication;”
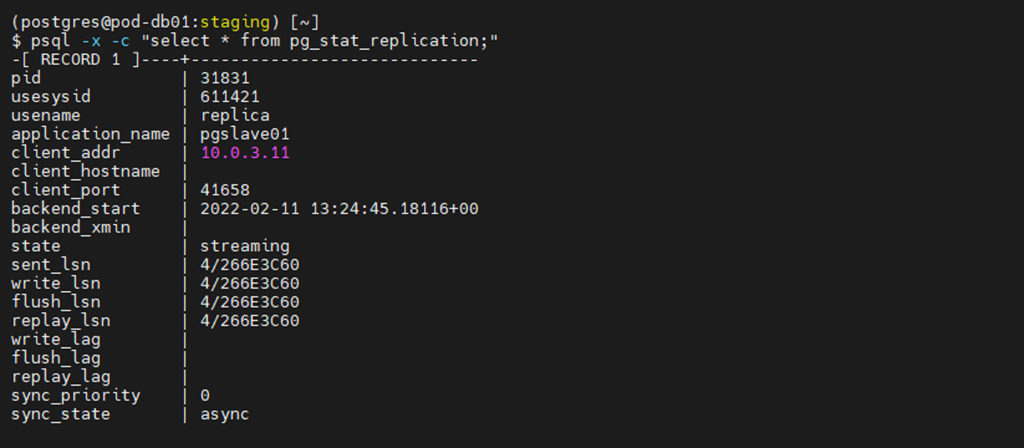
The first two tests show that we are replicating from the Primary to the Secondary Servers. The subsequent tests use inserted data to verify that the information is conveyed correctly to the Secondary Server.
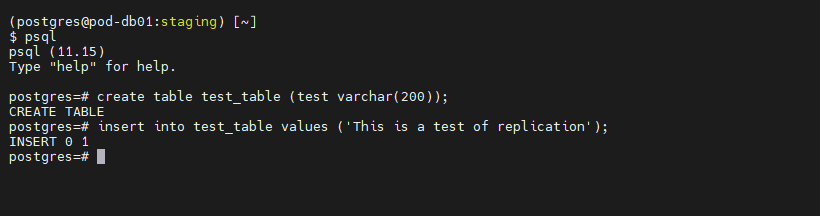
We will now test the setup by inserting records into the Primary and replicating them to the Secondary. Create a table and insert some values using a couple of simple SQL queries. First off, enter the Postgres Command line by entering psql.
psql
At the command line, enter the following queries.
CREATE TABLE test_table (test varchar(200));
INSERT INTO test_table VALUES (‘This is a test of replication’);
Once the record has been inserted into the new table, open an SSH session with the Secondary Server. Login into it and switch users to the postgres user using the following command.
su – postgres
Enter the Postgres command line once you have switched users by entering psql.
psql
While at the Postgres command line, check that the data was replicated to Secondary using the following SQL query.
SELECT * FROM test_table;
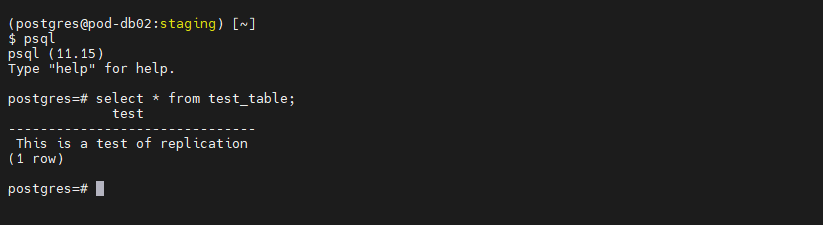
This should return the data that you inserted into the Primary Server.
That is it. You have set up replication between two PostgreSQL 11 servers. I have also used PgAdmin and verified table and other object counts to double check that everything has been copied over from the Primary for further testing.
Add Comment